Đang Tải...

Trang chủ
Tot Blog

TotNews & Promotions

How to buy and use TOT VDC in basic

19/07/2024

icon

The following is the most basic guide on how to buy as well as how to manage and use TOT VDC service (TotHost Virtual data center).

Mục lục

Mục lục

1. How to buy TOT VDC

Step 1: Choose VDC on demand

Access into the TOT VDC page on TotHost CloudGate. Here, you can optionally choose VDC with the configuration and number of IPs that suit your needs. Then, proceed to pay for the order as usual.

Step 2. Submit a resource setup request

After completing the payment, please create a ticket to send your VDC configuration request, including: the number of VMs (Virtual Machine) and the number of RAM, CPU, Disk, IPs each VM. Within 12 hours, the VDC and VMs will be set up according to your requirements.

For example: You buy VDC 01 and want to use all resources in only one 1 VM, send a ticket with the content: 1 VM:  5 vCPU, 10 GB RAM, 100GB SSD DISK, 8 IPv4

Step 3. Where to get VDC information?

When setup is completed, you will receive VDC information via Ticket and Email. Please access our ONGate to continue managing and using your VDC.

2. Manage and use TOT VDC on ON Gate

2.1. VDC management ON port interface

All TotHost's VDCs are controlled at one portal gate: ON Gate: https://on.tothost.vn/login.
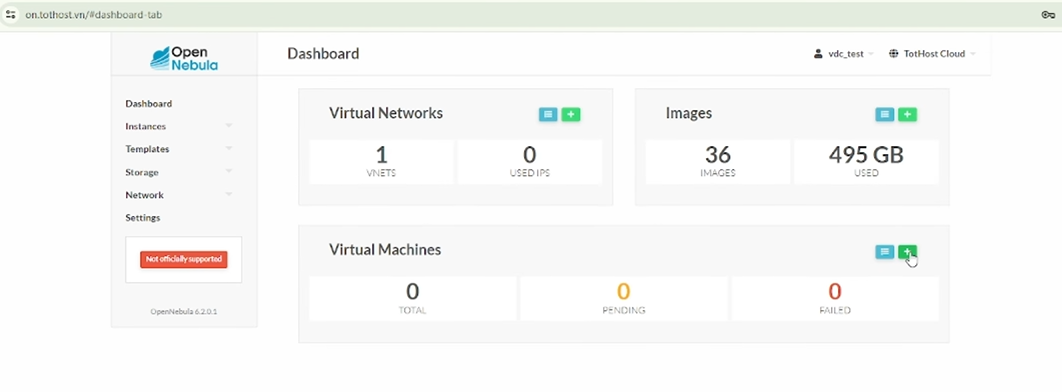
Giao diện quản lý TOT VDC sau khi đăng nhập cổng ON

After sign in the ON Gate, you will see the Client's Dashboard with:

  • Virtual Networks (VNet): where controls your VNet and IPs which are being used. Note: We recommend not to change the IP configuration to avoid unexpected impaction to the service(s).
  • Images: having the Images (templates) of VM, available OS templates includes CentOS, Windows, Ubuntu versions. You can also create your templates by uploading a new version or adjusting the default versions.
  • Virtual Machine: including all your active VMs. You could create new VMs from here.

On the left column, there are several user-manageable functions:

  • Templates: Manage and create templates to deploy virtual machine (VMs), or deploy multi VMs at once (Services), and even create Vitral Router.
  • Storage: where stores all Images, Files uploaded as well as the Apps downloaded.
  • Settings: Check the resources provided for the VDC at Group Quotas.

2.2. Monitor status and basically customize VMs belonging to VDC

Access the VMs monitoring page (https://on.tothost.vn/#vnet-tabs). In here, you would see all VMs which were created from your VDC. Need to customize or monitor any VM, click on that VM and you will be taken to the VM management interface.

In the bar at the top, there are some basic features:
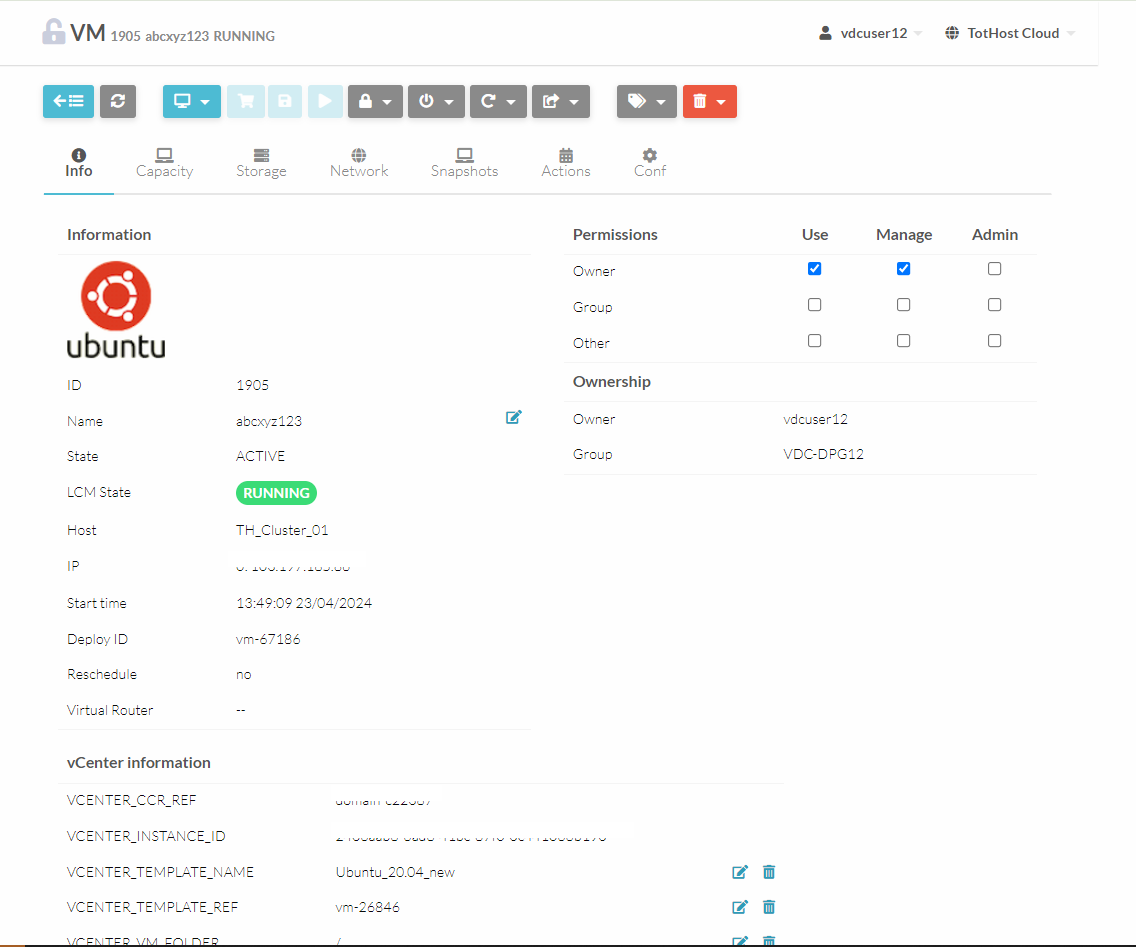
  • Tools to Console to VM: VMRC, SSH, RDP…
  • Lock / Unlock VM. After choosing "Lock", the VM will not be deleted.
  • Power icon: including function keys to pause, turn off or stop server deployment.
  • Reboot VM: including reboot and reboot hard.
  • Terminate: Delete VM by clicking on the trash icon.
  • Labels: Assign VM labels to manage virtual machines more conveniently

Bảng điều khiển VM của TOT VDC

Management tabs:

  • Info: Contains VM information such as ID, name, operating status, ownership, IP, as well as operational monitoring parameters
    Check the VM status in the LCM State: Running means the VM is running.
    You can also rename the VM in the Name section.
  • Capacity: Displays VM configuration parameters and usage performance
  • Storage: Disk and Image capacity are allocated and the usage efficiency. You can add Disk in AttachDisk or delete disk in Detach.
  • Network: Displays the number of IPs allocated to the VM and usage performance
    Add network configuration: Select AttachNIC. When you don't need to use it, you can detachNIC.
    Add IP: In the Advanced Options part, Override Network IPv4 section, enter the IP in the IP box and click the Attach button.
  • Snapshot: Create/ delete snapshot, all the VM's snapshots are stored here.
  • Actions: Set timer to pause, reboot or delete VM.
  • Conf: VM configuration. Recommendation: do not change.

2.3. How to Create a Virtual Machine from VDC

Step 1: Click the "+" sign in the Virtual Machines section.

Step 2: Select the OS from the Template list and fill in the configuration details for the VM you want to create.

  • VM Name: The name of the virtual machine.
  • Number of instances: Enter the number of VMs you want to create.
  • Start on hold: Tick this box if you want to save this configuration for use when creating future VMs.
  • Enter the amount of RAM (Memory), Virtual CPU (minimum 1GB), and Disk as needed.
    Note: The default disk size is 10GB. If you want to change the disk size, create the VM successfully first, then you can customize the disk space.

Step 3: Set up the IP and network under the Networks section, in the Interface section:

  • Interface type: If you want to add multiple IPs to the VM, enable the Alias option.
  • Network selection: Enable Auto Selection for the IP to be automatically assigned from the provided IP pool.
  • Enable both RDP Connection and SSH Connection.

After completing the settings, click the green Create button on the top left to initialize the server. The server will be initialized within a few minutes.

2.4. Adding More IPs to a Created VM

TOT VDC Running

Once the VM has been created and its status is Running, you can add multiple IPs by following these steps:
Access the VM and go to the Network section.
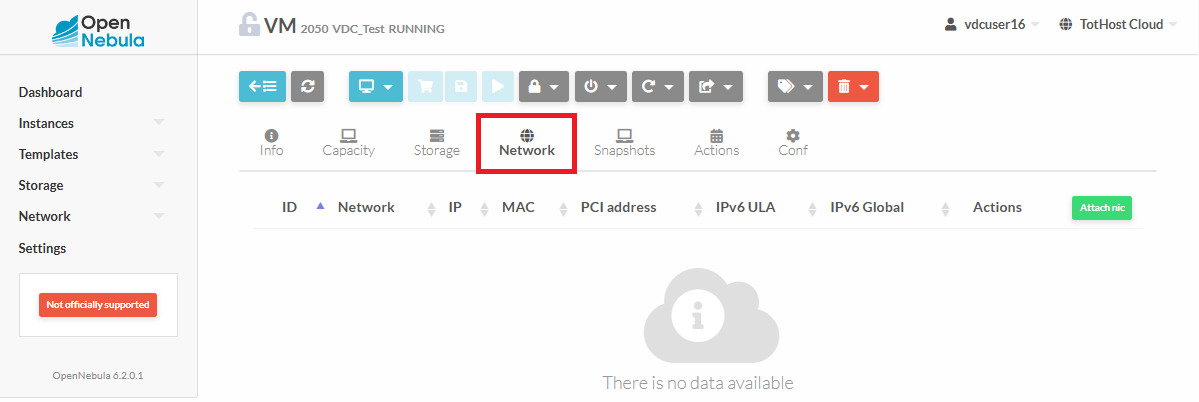
TOT VDC Network Section

Select Attach NIC -> Choose an IP Pool.
Check the box Select attach as alias.
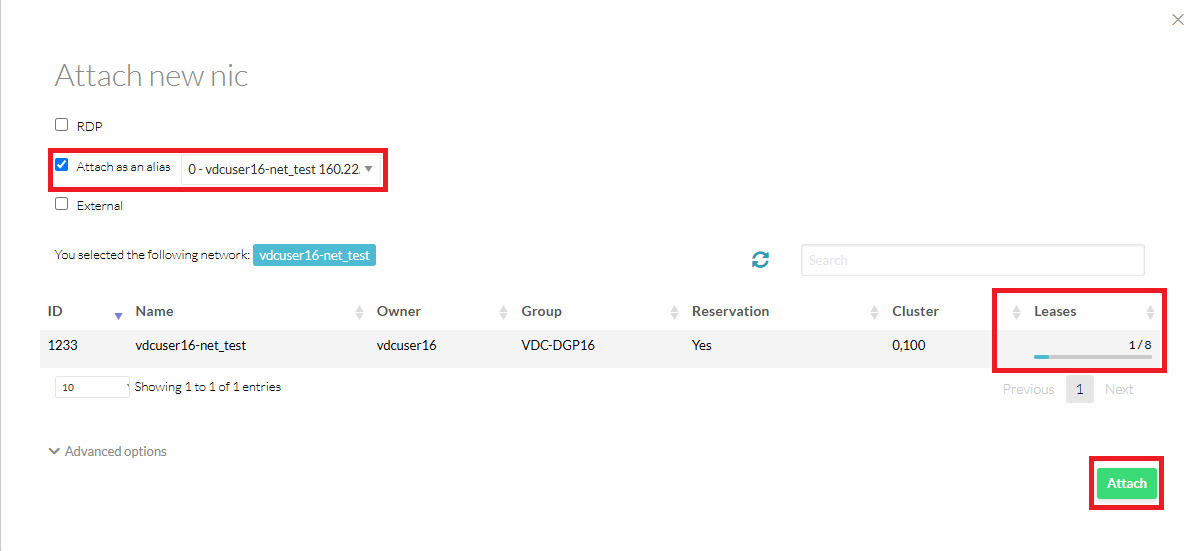
TOT VDC Attach IP

The Lease section will display the number of IPs you can add.
Click the Attach button to add the IP to the VM (You can only add 1 IP at a time).

Repeat these steps until the VM has the required number of IPs.

2.5. Changing VM Disk Size

After the virtual machine has been created, click the Resize icon with the arrow pointing outwards, as shown in the image, to increase the disk size.
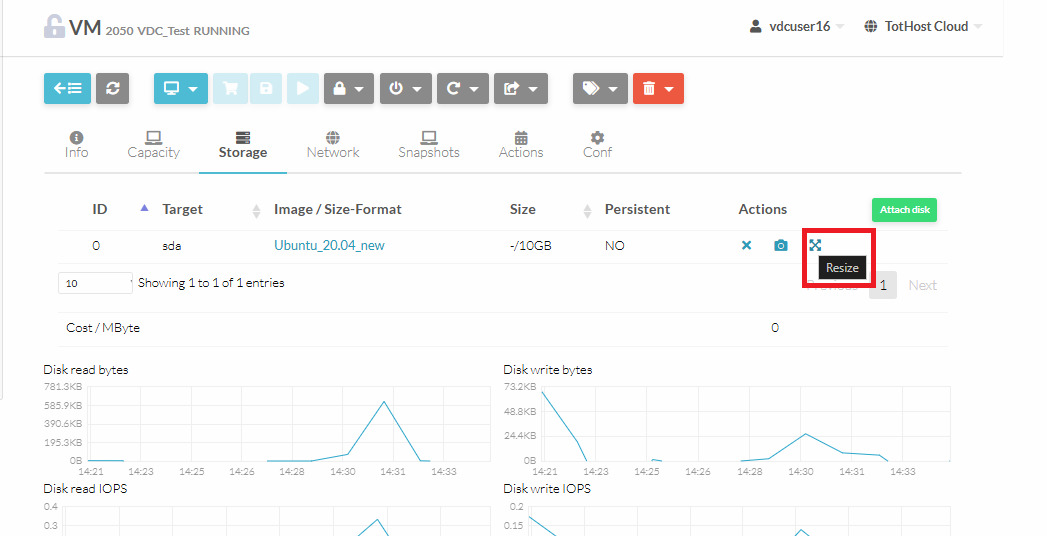
TOT VDC Resize Storage Disk

Select the desired disk size and click Resize.
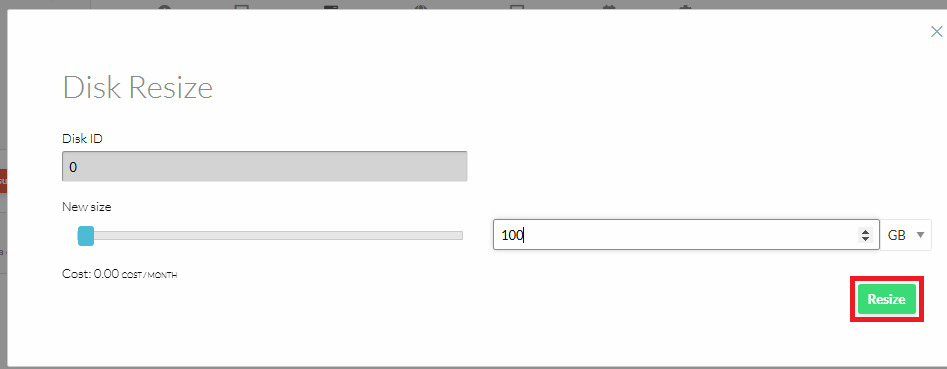
Choose Storage Resize

After resizing, a Restart is required for the VM to recognize the new disk size.
Click the Reboot Hard button, wait for the system to restart, and your VM will be set with the new disk size.
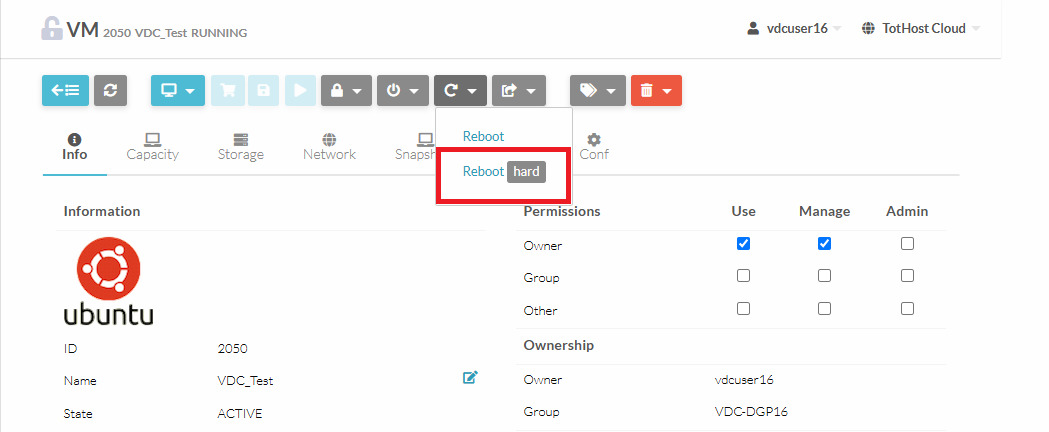
TOT VDC Hard Reboot

You can see more instructions in the video below:

TAG: totdoc

TelegramCommunity
scroll top
Thông báo
Đóng