Guide to Changing DNS on Linux and Windows Servers
11/09/2024
Typically, your device will use DNS settings configured by your Internet Service Provider (ISP). However, you can proactively change these settings to optimize internet speed or bypass restrictions on certain websites. Check out this article from TotHost to learn how to check and change DNS settings on Linux and Windows servers!
Mục lục
Mục lục
1. Some DNS Options You Can Use
When browsing the internet, in some cases related to internet speed or blocked website access, changing your DNS might be the simplest solution and is very easy for users to implement. TotHost will provide a comprehensive guide on how to change DNS on Windows/Linux servers from A to Z.
First, here is a list of trustworthy DNS addresses you can use:
Next, you need to check your device's DNS before making changes.
2. How to Check the Current DNS of Your Server
If you don’t know how to check the DNS you’re using, follow these methods:
2.1. Checking on Linux Servers
There are various Linux OS versions, so the terminal commands to check DNS may differ. TotHost will guide you through the three most common Linux OS:
2.1.1. Ubuntu
For different versions of Ubuntu, the command to use will depend on your system's network configuration. You can use one of the following commands:
netplan get
or
systemd-resolve --status
or
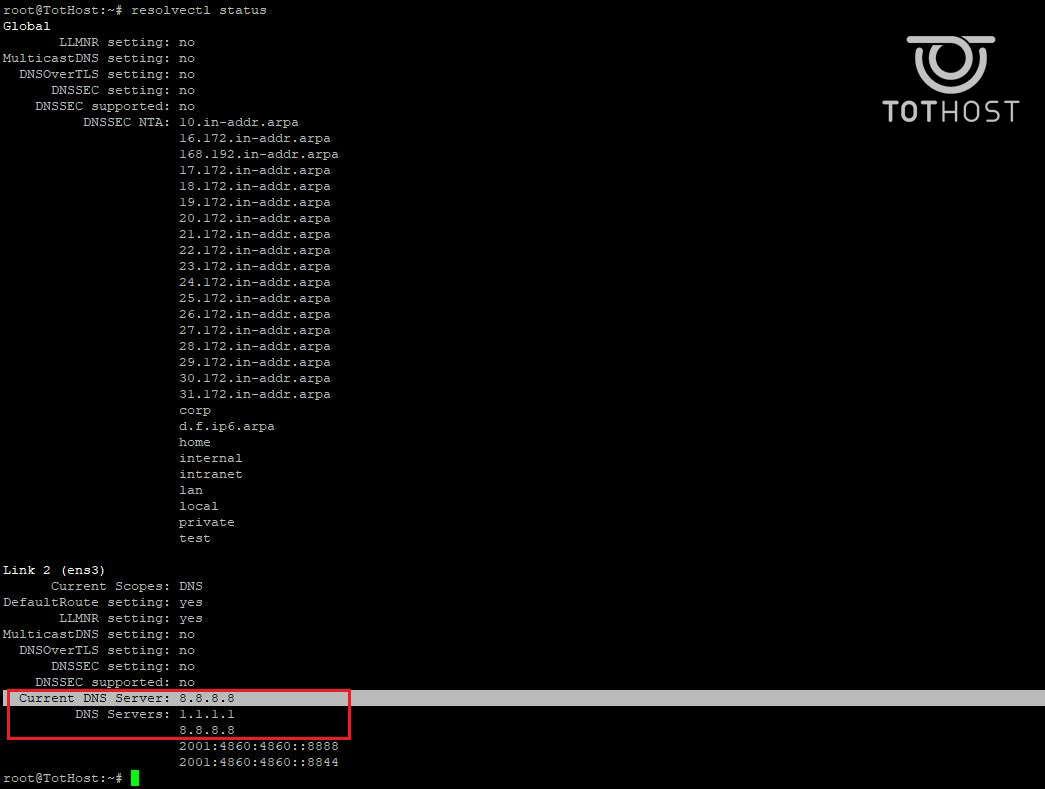
resolvectl status
DNS information will be displayed as follows:
2.1.2. Debian
On Debian, in addition to the commands used on Ubuntu, you can use:
nano /etc/resolv.conf
2.1.3. CentOS
The commands listed above can also be used with CentOS. Additionally, if you are using Network Manager, you can run the command:
nmcli -show
2.2. Checking on Windows Servers
On Windows servers, you can check the DNS settings being used through Command Prompt. Use the key combination Win + R, then type cmd to open Command Prompt.
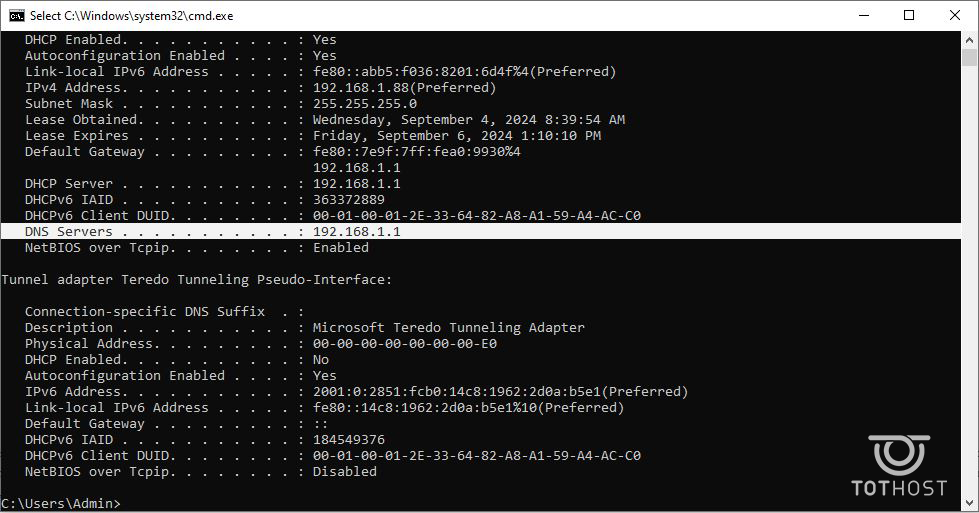
In the Command Prompt window, type ipconfig/all and press Enter.
The window will display results containing the current DNS Server information.
3. Guide to Changing DNS on Linux and Windows Servers
Once you’ve checked what DNS your device is using, follow these steps to change it:
NOTE:TotHost has already set up a script to change DNS on Linux VPS. You only need to run a single command: ./update_dns.sh
3.1. Changing DNS on Linux Servers
The network configuration file on a Linux server system is usually located in the /etc directory and is named resolv.conf. Therefore, you need to edit this file by opening the Terminal and running the command. You can refer to the TotHost Vietnam YouTube video or follow the steps below:
3.1.1. Ubuntu
Type the command:
vi /etc/netplan/
or
nano /etc/netplan/
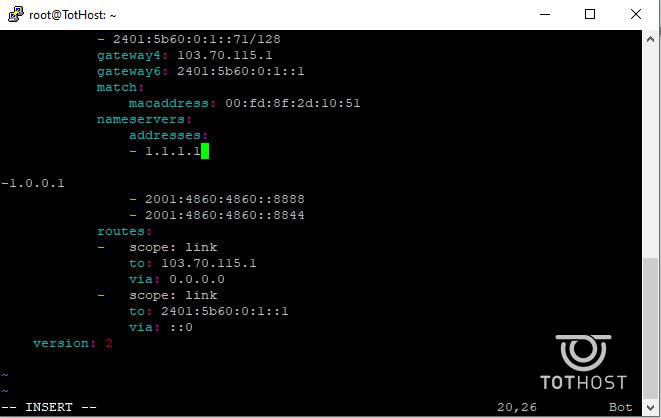
Then press Tab, and the command will automatically add the file 50-cloud-init.yaml.
Proceed to edit by pressing “i” to switch to edit mode (you’ll see the word INSERT at the bottom). Enter the DNS addresses and save by using the command :wq.
Apply the changes to the system with the command:
netplan apply
3.1.2. Debian
On Debian, the process is similar to Ubuntu:
nano /etc/network/interfaces.d/
You should also press Tab to auto-fill 50-cloud-init.yaml
Follow the same editing steps as for Ubuntu.
3.1.3. CentOS
Type the command:
cd /etc/sysconfig/network-scripts/
Next, use the command:
vi ifcfg-eth0
Edit the DNS address information.
Restart the system with the command:
systemctl restart NetworkManager
3.2. Changing DNS on Windows Server
3.2.1. Using Command Prompt (cmd)
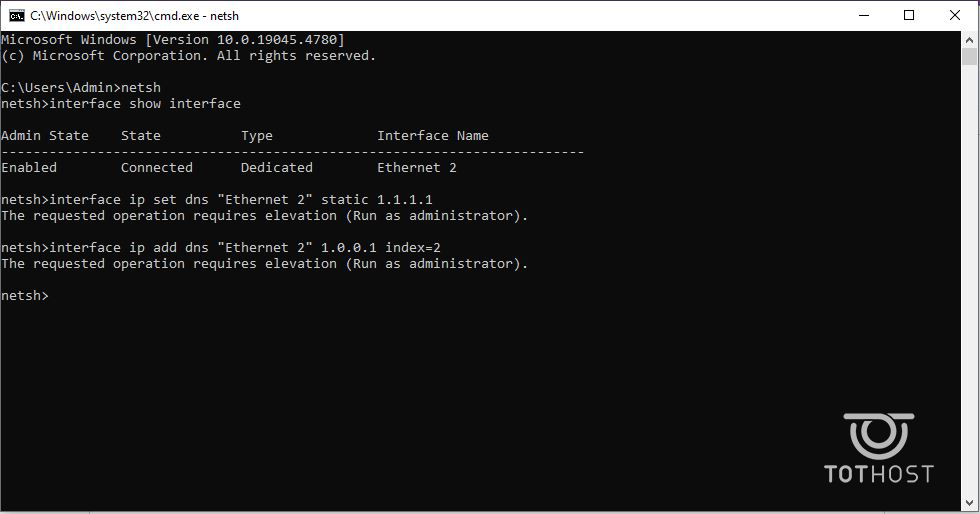
Open Command Prompt and type netsh to access the configuration state.
Use the command interface show interface to display the necessary DNS information for the changes.
Then, enter interface ip set dns name=[Interface Name] static [DNS Address] and press Enter.
To add a secondary DNS, enter interface ip add dns [Interface Name] [DNS Address] index=2 and press Enter.
Finally, close cmd and restart your computer for the new DNS address to take effect.
3.2.2. Using Control Panel
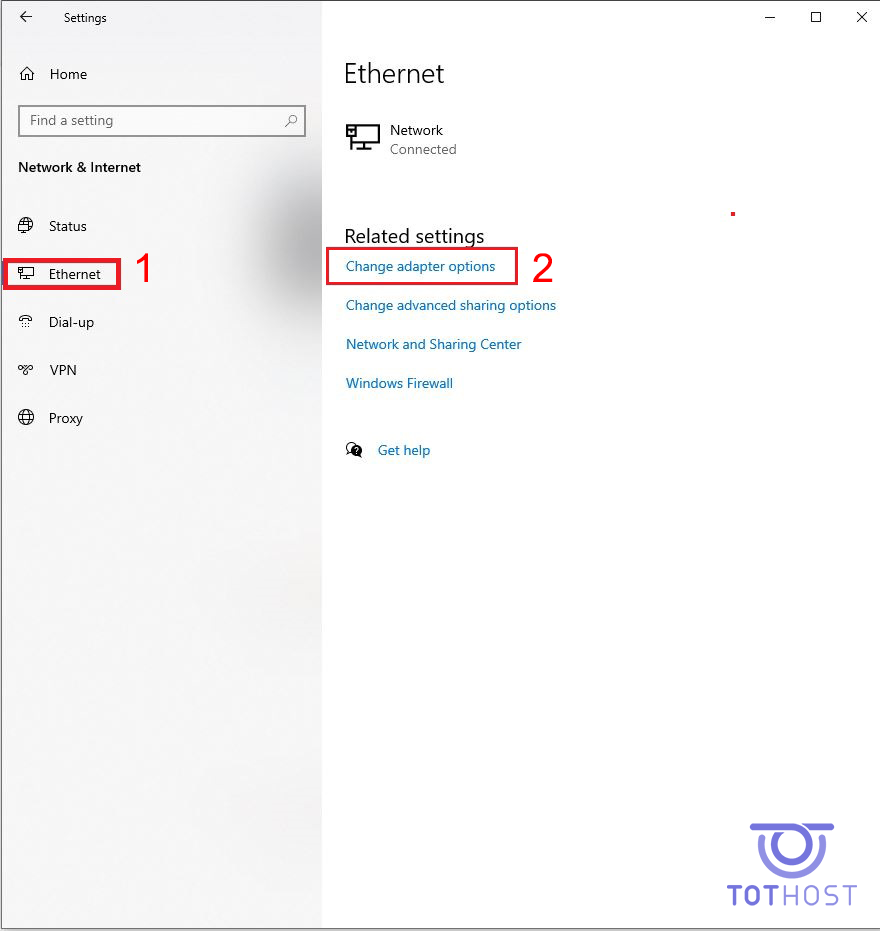
Open Settings, select Network & Internet.
Under Ethernet, click on Change Adapter Options.
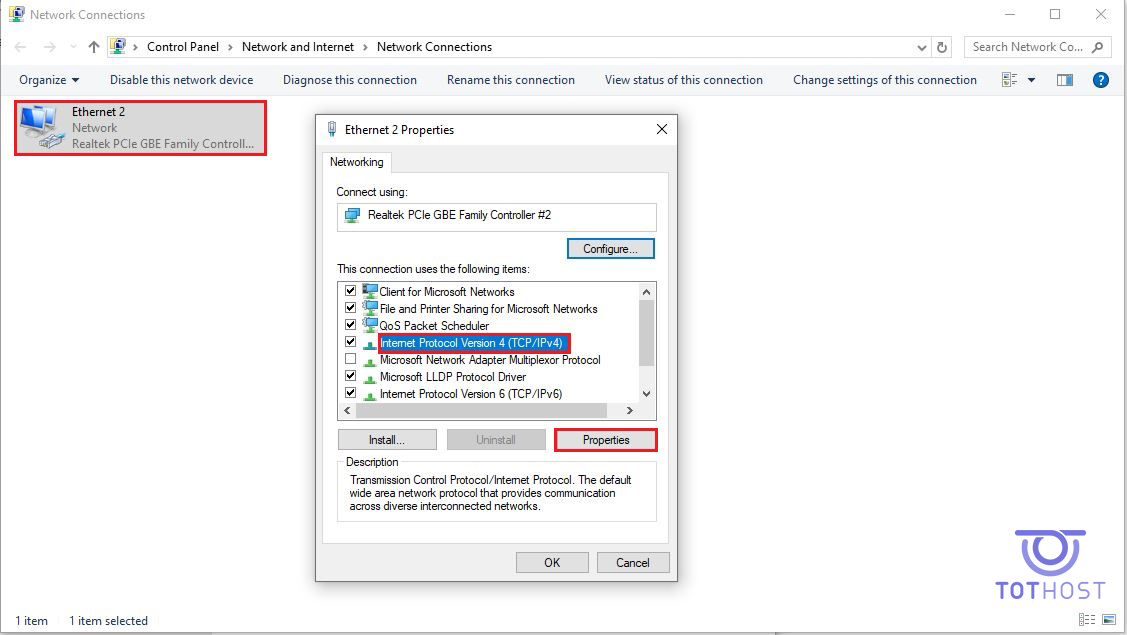
Right-click on the network you are connected to -> Properties.
Find and select Internet Protocol Version 4 (TCP/IPv4).
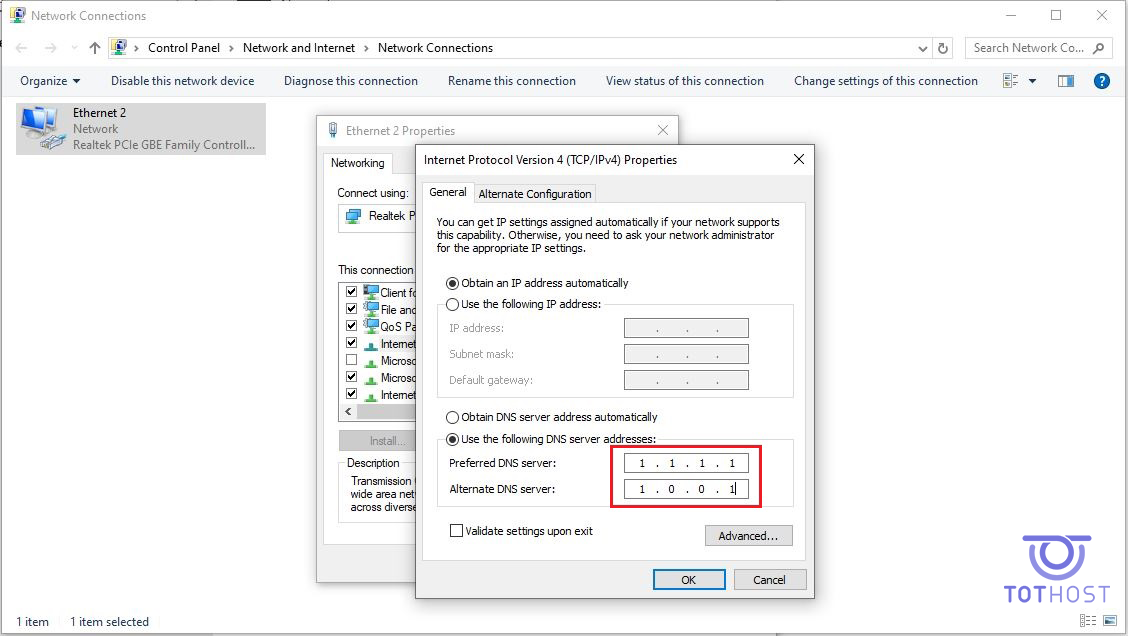
Click on Properties to edit the information. Check the box for Use the following DNS server addresses -> Enter the Preferred DNS Server and Alternate DNS addresses you want to use. You can use one of the DNS options provided at the beginning of this article. For example, for Cloudflare, enter 1.1.1.1 and 1.0.0.1.
Finally, click Save and restart your computer.
With this guide, you can easily change DNS on your Windows/Linux servers. Once changed, note that it may take a short time to see the effects of this action. If you found this article helpful, please support us by sharing it with TotHost!
Bài viết này sẽ hướng dẫn bạn từ A-Z cách setup và sử dụng kết hợp OpenClaw, Hermes Agent với 9router - một trạm trung chuyển giúp bẻ lái các truy vấn API giúp bạn có thể sử dụng các API LLM hoàn toàn miễn phí từ đó tiết kiệm được rất nhiều chi phí vận hành các AI agent.
Xu hướng ứng dụng AI đang chuyển dịch mạnh mẽ sang AI Agent – những trợ lý ảo có khả năng tự suy luận, tự đưa ra quyết định và tự động thực thi các tác vụ phức tạp. Bên cạnh OpenClaw, trong số đó, Hermes Agent (được phát triển bởi NousResearch) đang nổi lên như một công cụ đắc lực cho dân Dev và MMO. Cùng TotHost so sánh khác biệt giữa 2 trợ lý AI này và tìm hiểu cách cài đặt Hermes chạy 24/7 trên VPS Linux Ubuntu nhé.
Bạn đang tìm kiếm một giải pháp để tự tạo VPN cá nhân, quản lý Proxy hay xây dựng hệ thống MMO trên VPS? 3X-UI chính là công cụ mạnh mẽ và trực quan nhất hiện nay để làm điều đó. Bài viết này sẽ hướng dẫn chi tiết cách cài đặt 3X-UI trên VPS Linux, từ các bước thiết lập cơ bản đến các cấu hình nâng cao như định tuyến nhiều IP (Multi-IP).
Trong bối cảnh AI tạo sinh ngày càng trở thành “vũ khí” quan trọng của đội ngũ sáng tạo nội dung và studio thiết kế, Stable Diffusion 3.5 nổi bật nhờ chất lượng ảnh, khả năng hiểu ngữ cảnh và tốc độ vượt trội so với các phiên bản trước. Bài viết này hướng dẫn bạn cài đặt và sử dụng Stable Diffusion 3.5 trên VPS GPU chạy Windows — lựa chọn phù hợp khi bạn cần hiệu năng mạnh, làm việc từ xa qua RDP, và khả năng mở rộng linh hoạt mà không phải đầu tư máy trạm đắt đỏ.
When using the Windows operating system on a VPS, initially, you won't be able to download any files from the internet using Internet Explorer. This is because the Download feature of this browser is not enabled. This article will guide you on how to enable the Download feature so you can download software while using the server.