Guide to Changing Date, Time, and Timezone on a Linux Server
25/07/2025

Đang Tải...
12/04/2024
Migrating a website from hosting to VPS helps expand resources, especially for websites with high traffic, ensuring better stability. What do you need to prepare and consider when doing so? Here is a guide for migrating WordPress websites from cPanel hosting to Linux VPS.
Mục lục
Mục lục
After a period of operation, websites tend to grow, and so does their traffic. This is something everyone hopes for. However, the traffic may exceed the capacity of shared hosting. At this point, we need to upgrade or expand. However, the nature of shared web hosting, in general, and cPanel hosting, in particular, is sharing resources with other websites. Therefore, upgrading is challenging.
The solution for this case is to migrate the website from shared web hosting to a VPS environment. A virtual private server allows for easier upgrading because the bandwidth is broader (not sharing the connection with other websites), and the storage capacity is significantly increased.
So why choose VPS Linux? You can also run Windows. However, with a Windows server, you'll need to install more. Moreover, Windows consumes more resources than Linux, so it won't optimize operational costs.
To rebuild a website, we need:
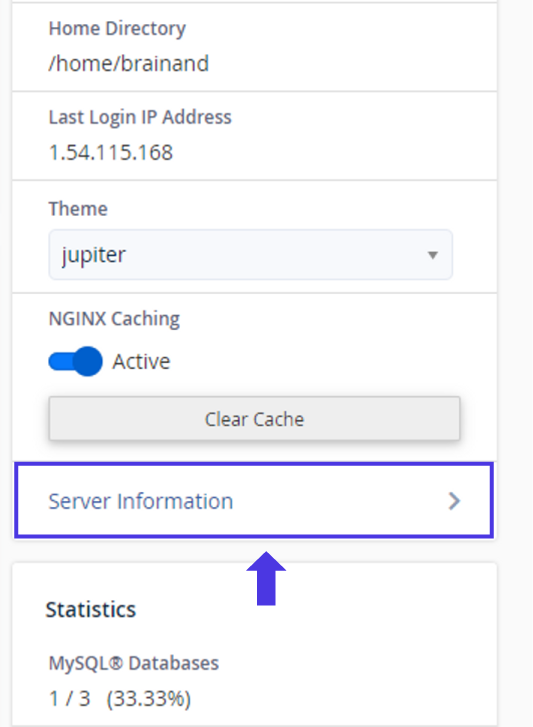
First, we need to know the basic information to prepare, such as SQL version, PHP,... Click on Server Information below:
After clicking, we will have complete server information as follows:
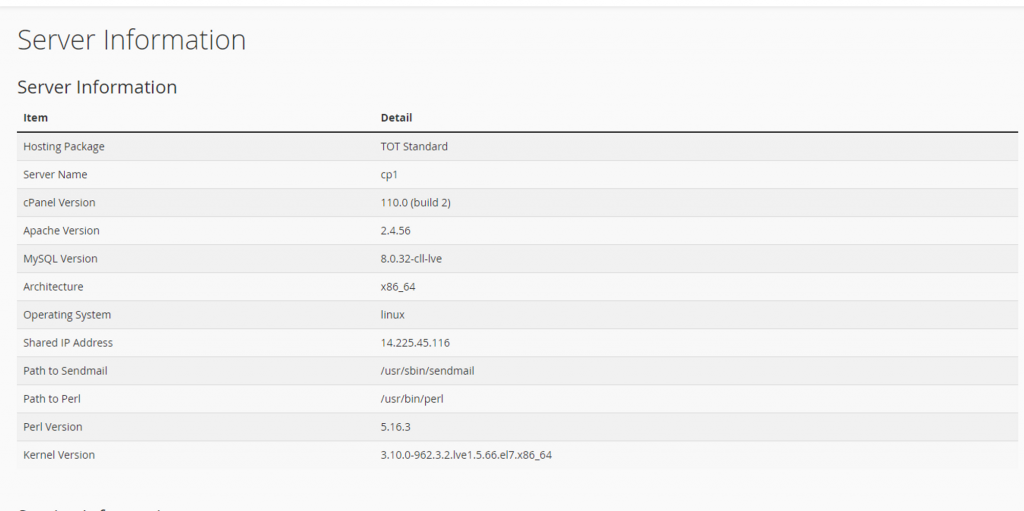
Necessary server information when migrating a website from shared web hosting to VPS
Before starting the migration, we need to prepare the necessary services for the website to function properly on the new server. Here, TotHost uses Ubuntu20.04 OS to rebuild the website.
Step 1. First, update the server to ensure that the current services are in the latest and best state: sudo apt-get update && sudo apt-get upgrade -y
sudo apt-get update && sudo apt-get upgrade -y
Step 2. Determine the MySQL version to find the appropriate installation package. If the version is incorrect, adding a DB will encounter many integration issues between services. Therefore, installing the correct version is essential. According to the server information obtained in (2.1), this cPanel is currently using MySQL 8.0. Now, MySQL has become MariaDB, so we will have to find the source from dev wget https://dev.mysql.com/get/mysql-apt-config_0.8.15-1_all.deb
wget https://dev.mysql.com/get/mysql-apt-config_0.8.15-1_all.deb
Step 3: After downloading the MySQL package, we will start installing this package to the Repository sudo dpkg -i mysql-apt-config_0.8.15-1_all.deb
sudo dpkg -i mysql-apt-config_0.8.15-1_all.deb
MySQL config dialog box in the repository
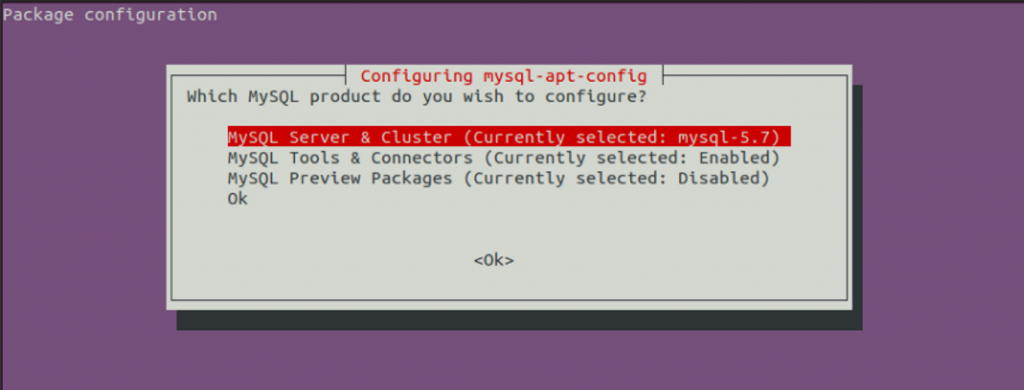
When the dialog box appears, select <Ok>
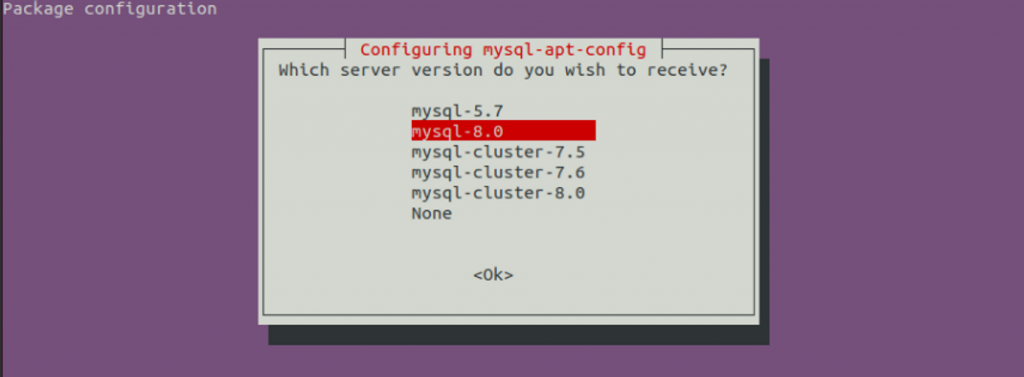
Select "mysql-8.0" and continue to select <Ok>
Step 4. Set up the WebServer: sudo apt install apache2 -y
Step 5. Start the services
systemctl start apache2
systemctl enable apache2
Step 6. Install PHP and all packages
sudo apt -y install php7.4
sudo apt-get install -y php7.4-cli php7.4-json php7.4-common php7.4-mysql php7.4-zip
First, let's handle the Database:
Step 1. Go to File Manager → public_html → select wp-config.php → choose view to see the DB name How to get the DB name:

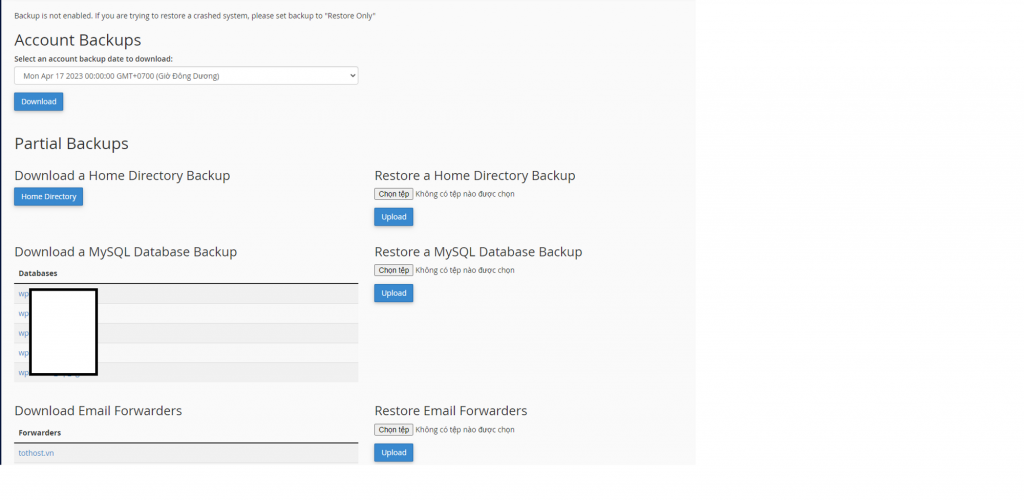
Step 2. Go to Backup → select Download a MySQL Database Backup to download the database. Download the DB to migrate the website from cPanel hosting to VPS Linux
Step 3. Go to MySQL, recreate a DB with the same name and a similar account as in the wp-config.php
mysql> CREATE DATABASE wordpress ;
mysql> CREATE USER ‘wordpressUser‘@‘localhost’ IDENTIFIED BY ‘strong_password‘;
mysql> GRANT ALL PRIVILEGES ON wordpress.* to ‘wordpressUser‘@‘localhost’;
Remember to replace the database name, username, and password in these queries. After the database is ready, exit the MySQL CLI.
Step 4. Restore the data we just downloaded. First, upload the newly created database file to the server. When downloaded, the file will be in the format <database_name>.sql.gz, so we will run a command like this:
gunzip < <database_name>.sql.gz | mysql -u root -p <database_name>
Step 1. Get a backup of the old website at Backup → select Download a Home Directory Backup. Upload and unzip it into the /var/www directory.
Step 2. Change the ownership to Apache: When we unzip it, the directory is still owned by the user/root, so Apache does not have permission to read the data, we need to change it back to Apache's ownership.
sudo chown -R www-data:www-data /var/www/example.com
Step 1. Create a configuration file
sudo vi /etc/apache2/sites-available/example.conf
Step 2. Enter the following data:
<VirtualHost *:80>
ServerAdmin [email protected]
ServerName example.com
ServerAlias www.example.com
DocumentRoot /var/www/example.com
ErrorLog /var/log/apache2/example-error.log
CustomLog /var/log/apache2/example-access.log combine
</VirtualHost>
If your website uses SSL, duplicate the above section, replace :80 with :443, and add the following key path:
SSLCertificateFile <link>/fullchain.pem
SSLCertificateKeyFile <link>/privkey.pem
Step 3. Run the command to enable your site
$ sudo a2ensite example
$ sudo service apache2 restart
The last step is to point the domain back to the IP, and you're done.
The default system language on Windows 10 is English. However, during use, you can switch to another language, such as Vietnamese, Chinese, etc., according to your preference. In this article, TotHost will guide you through the simplest and most detailed steps to change the language on Windows 10.
24/03/2025
Changing your password is an important measure to enhance security and prevent unwanted risks. Therefore, the first step to take after registering for a service is to change the password. Please follow the instructions from TotHost to change the password on your Linux server!
16/12/2024
When using VPS TOT K at TotHost, you will manage it through the Virt Fusion control panel. This article will guide you through operations with the Virt Fusion Panel.
21/10/2024
This article provides detailed instructions on how to register a VPS management account on the CloudGate portal (billing.tothost.vn) at TotHost.
01/10/2024
This article provides detailed instructions on how to upgrade the configuration of Cloud VPS TOT M and TOT D on the TotHost management page.
26/09/2024